Friday, April 22, 2016

sharepoint workspace 2010 - Error: Running in limited functionality

Sharepoint  workspace 2010: gives the error below once you login, & then usually no files can be open without a very long delay

Error : sharepoint will run in limited functionality 

Solution: follow these steps: 

1) Add the following files to your local windows firewall (even if you are on a domain)
Groove.exe 
MSOUC.exe
MSOSYNC.exe
these files are located:
C:\Program Files (x86)\Microsoft Office\Office14

p.s. :make sure that these files are allowed on all your netwoek types (public, private &home)
2) download then install these hotfixes on your windows
 

Windows 32 bits hotfix from HERE
Windows 64 bits hotfix from HERE


Wednesday, March 2, 2016

SharePoint 2010 - Export Selected Items to Excel


In SharePoint 2010, sites can export custom list items to Excel using the Export to Excel option in the ribbon toolbar. It will export all items in that particular view in which the option is invoked. SharePoint literally is not exporting the items it creates in the query file instead, which will have the view id and helps to query the SharePoint list data and the results are shown in the excel spreadsheet. 

Now if I have a requirement something like, I need to export only specific items from the list. Let's say I want to export only 10 items out of 30 items shown in the view then there is no direct option for that. I need to create a view and apply filter to extract only the specific 10 items which I want to export. But I can' t create views every time to export any specific items. What if I don't have appropriate permissions to create views? 

To overcome these kind of issues, I have found a component which will export the specific items from the custom list. Its a custom action which will create the "Export to excel" ribbon button. Just select the items and click on the button in the ribbon to export the items.

Here's the simple, fast solution WSP for how to Export custom list items to Excel in SharePoint 2010. 

Download it from HERE

How To

  1. Deploy the WSP to the concerned web application
  2. Go to site features and activate the feature
  3. Use the export functionality in the custom list
Thanks to Code Project

 *******

Another issue, If you want to export to excel based on a certain filter, just make a view with this filter.

Tuesday, February 23, 2016

Sharepoint 2010 Lists not showing title all suddenly on adding or editing .


You have Sharepoint 2010. Everything was fine, until suddenly Lists are not showing title on editing or adding.. Even If you try creating new lists, same problem. Solution?

Go to main Site then:

Go to Site Actions Then Go to  Site Settings Then Go -->:(Galleries) Site Content Types : 

from  List Content Type, click on: Item  

-->:Click on the "Title" under columns

 And then make sure you choose required. 


Wednesday, January 6, 2016

Sharepoint Library : Download Error (Size)

PROBLEM:

From a SharePoint 2010 Library, you try to download some shared files and came across an issue where all files larger than 50MB generated the error above, specifically Error 0x800700DF: The file size exceeds the limit allowed and cannot be saved. 
The problem is with the Windows 7 machine you are using but this solution also applies to Windows 8.

SOLUTION:

The solution is editing the registry by following the instructions below:

  1. Go into Regedit

  2. Navigate to: HKEY_LOCAL_MACHINE\SYSTEM\CurrentControlSet\Services\WebClient\Parameters\FileSizeLimitinBytes

  3. The default value in the FileSizeLimitinBytes DWORD is shown by the following screenshot and is set to 50MB (50000000). The value in the DWORD is in bytes.

  4. Please click on the picture to get a clearer view

  5. Change this value to a value of your choice and hit ok

  6. Don’t forget to restart your computer.

Tuesday, June 9, 2015

“Approaching SharePoint Web site storage limit”

The problem:

If you’re running SharePoint 2010 Enterprise, chances are eventually you’ll see this e-mail:
Subject: Approaching SharePoint Web site storage limit
Body: You are receiving this e-mail message because you are an administrator of the following SharePoint Web site, which has exceeded the warning level for storage:http://[sharepoint]/sites/[site collection]/. To see how much storage is being taken up by this site, go to the View site collection usage summary: http://[sharepoint]/sites/[site collection]/_layouts/Usage.aspx

What is it?

Don’t panic. It’s just the SharePoint Site Collection Quota doing its job.
A quota template consists of storage limit values that specify the maximum amount of data that can be stored in a site collection. When the storage limit is reached, a quota template can also trigger an e-mail alert to the site collection administrator. You can create a quota template that can be applied to any site collection in the farm.

How do I change it?

Follow these steps:

1- Go to Central Administration. (Application Management --> Site collection --> Specify Quota Templates --> edit existing template --> Change storage Limit to your wish (ex: 100mb to 300 mb) --> warning email Limit to your wish (ex: 80 mb to 280 mb) --> save.)


2- Specify Quota Templates
Specify Quota Templates allows administrators to define templates to later be applied to multiple sites.

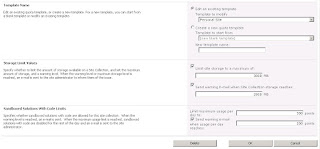
Template Name : Allows the administrator to choose a template to edit or create a new template from scratch or existing template.
Storage Limit Values: Allows the administrator to set a site storage limit and a warning e-mail limit.
When a site storage limit is reached, the site is locked from any content being added. To enable just check the box next to “Limit site storage to a maximum of:” and specify a size limit.
When a site warning e-mail limit is reached, Site Collection administrators receive the e-mail noted at the beginning of this post. To enable just check the box next to “Send warning E-mail when Site Collection storage reaches:” and specify a size limit.
Sandboxed Solutions With Code Limits: Allows the administrator to set a limit on the maximum usage of Sandbox solutions per day, and have a warning e-mail generated when a sandboxed solution reaches a points-based threshold.
When a sandbox solution reaches the maximum point allotment, the code is disabled for the rest of the day and site collection administrators are alerted via e-mail. To enable just check the box next to “Limit maximum usage per day to:” and specify a point limit.
When a sandbox solution reaches the warning threshold, the site collection administrators are alerted via e-mail.  To enable just check the box next to “Send warning E-mail when usage per day reaches:” and specify a point limit.

3- Specify Quotas and Locks

Specify Quotas and Locks is where administrators go to specify quotas to use on a given site collection. Quotas can either an individually specified quota or a Template .

Site Collection: Allows the administrator to choose which Site Collection to apply settings to.
Site Collection Lock Information: Allows the administrator to manually set lock status on a site collection.
Site Quota Information: Allows the administrator to choose a Quota Template (see above) or specify individual quota settings for a site collection. Individual settings are the same as “Site Template Settings” (see above).

Considerations:

So what do we set these at anyway? Well there are a few very important considerations to be made.
  • How fast do I expect this site collection to grow?
    • The whole purpose of this alert is to give you a clue how rampant growth is in your environment. You don’t want to get e-mails every day, so consider setting this high enough that it doesn’t bother you, but low enough so that you have time to react.
  • Is my site collection database shared?
    • If so, how much of the full database do I want to limit this particular site collection to?
  • Is my site collection database at risk of running out of space?
    • If so, set these quota low and consider breaking your site collection up.
      • Remember : The recommended maximum database size is 100GB. The maximum supported database size is 200GB.

I hope this helps! If you just want the e-mail to go away, feel free to climb in and shut the darn thing off. I wouldn’t though, quotas are a great tool for your governance tool box! Use them wisely my friends!

Now, Changes to pre-existing My Sites should be effected by manually applying a Quota Template to that pre-existing My Site – if you wish to change the quotas for a given My Site you do so by applying a quota template to the My Site. If you wish to make changes to an existing quota template and have those changes reflected in existing My Sites you must re-apply that quota template to all My Sites which were created with it.

Friday, May 29, 2015

Move SharePoint documents and save it's unique URL , Create shorten URLs GUIDE

A guide with steps for how to create a unique URL for documents even the document is moved to another location in the site collection the users still can reach these documents using it's URL by activating Document ID featuer.Use this featuer to create shoren URL for SharePoint pu

thanks to Mr Wael Mohamad

 download the guide from here.

Wednesday, May 27, 2015

SharePoint 2010-Configure Pass Through Authentication (Firefox)

How to configure Mozilla Firefox to allow your network username and password to be automatically set to a website. 
The procedure in this article will only work for SharePont 2010 sites if your computer is joined to the UCHAD or ADLOCAL Active Directory domains and the SharePoint site is configured to accept NTLM authentication. To do so:

1. Type about:config and either hit the Enter key on the keyboard or the Go button next to the address bar.

 2. On some computers the warning below may appear. The title about voiding your warranty is amusing on purpose, but the warning is legitimate. Click the I'll be careful, I promise button.
3. Type NTLM in the filter box of the configuration window. Depending on the version of Firefox you are using, you will see 3 or 4 results. Double-click the NETWORK.AUTOMATIC-NTLM-AUTH.TRUSTED-URIS entry to open the Enter string value window.

 4. Enter the portal URL that you wish to access and click OK. You can enter multiple addresses separated by commas.


Enjoy firefox !

Thursday, May 7, 2015

Workflow Attach Document to an Item

Can you use a SharePoint workflow to attach a document to an item?
YES!!!
What do you need to make this happen?
SharePoint Designer
ILove SharePoint actions from codeplex.

On the server(s) that your web app is running, you will need to modify the PowerShell execution policy.
set-executionpolicy Unrestricted (Check this link for more info)


In SharePoint Designer add the Execute PowerShell Script action.
Click Script and add the PowerShell script below (make the needed changes to reflect your URL)
Add-PsSnapin Microsoft.SharePoint.PowerShell -ErrorAction SilentlyContinue

$web = Get-SPWeb "http://sharepointed.com/subsite/"
$filePath = "http://sharepointed.com/subsite/docs/taco.docx"

$spList = $web.lists["Your List or Library Name Here"] 
$item = $splist.GetItemById([*Add the workflows Current Item:ID here*])
$file = $web.GetFile($filePath).OpenBinary()

$item.Attachments.Add($filepath, $file)
$item.Update()

$web.Dispose()
 
$web = the site you are wanting to work with.
$filePath = file path to the document you are wanting to attach to the item that triggered the workflow.
$spList = List that contains the item we are attaching the document to.
$item = $splist.GetItemById() clear out the text between the (), in here you ware wanting to place ID of the item that triggered the workflow. This will tell the PowerShell script what item we are attaching the document to.

So simple yet effective!

Increase Storage Limit for One My Site User (Sharepoint 2010)

Increase Storage Limit for One My Site User (Sharepoint 2010)
Out of the box, the storage allocation for My Sites is real small (100 MB). In SharePoint 2010 and SharePoint 2007 you can increase the storage limits for each My Site.
In SharePoint 2010:
Central Admin > Application Management > Configure quotas and locks
First select the My Site Web Application, then select the users My Site you want to edit.
In the Site Quota Information section, change Current quota template to Individual Quota, then change Limit site storage to a maximum of: ___ to your new value.
You can also set the Send warning e-mail when site storage reaches value to remind the user they are running low on space.
Click OK, and you are ready for more storage.


Friday, September 12, 2014

Expiration Policy on items


Sharepoint 2010
Steps to set an expiration policy into Sharepoint document library, i find it very useful for IT people to set a policy for each document library,
p.s.: This will work if you have SharePoint Standard or Enterprise edition.
  1. Go To your Sharepoint Root webapplication, then in Site settings--> SiteCollection Administration--> Site Collection Policies -->
  2. Define a new policy
  3. Go to Central Administration --> http://CENTRALADMINISTRATION_URL/_admin/ServiceJobDefinitions.aspx
  4. We have 2 timer jobs to activate by order: 
  • 1: Information Management Policy 
  • 2: Expiration Policy
Now, you can add the policy stated at step 2, on your document library, how? let's see

If we want to set expiration date in a content type policy
 
1. This will work if you have SharePoint Standard or Enterprise edition. Open your site in a browser.
2. Select "Site Actions > Site Settings".
3. Click "Go to top level site settings". Of course, you don't see this link if you are already on the top level site.
4. Click "Site content types" under "Galleries".
5. Locate the content type that you want to use for setting the policy on. Click the link of the content type.
6. Click "Information management policy settings" under "Settings".


7. Select "Define a policy..." option and click OK.


Fig 2: Define a policy
8. Check "Enable Expiration" checkbox. Select "Created" or "Modified" in the item's properties and select days, months or years from the last drop down in the row. Enter a number in the middle text box. Now select action. You can choose the default action "Delete" or you can start a workflow and do custom actions. Click OK to save the settings.


Hope this will help someone. It is straight forward but I have seen users asking this question "How to set expiration policy on a content type".