Monday, May 13, 2019

"Open in Explorer" Icon is disabled in document Library

Problem : "Open in Explorer" Icon disabled in document Library
Environment : Sharepoint 2010 - windows 10 - Browsers tested : IE edge + Mozilla FireFox

Solution : Copy the URL of the document Library & then Make a Mapped Network to that URL

It will open smoothly, if you have the permission needed.

How to map a network:
  1. Open 'File Explorer'.
  2.  Right click on the 'Computer' icon, select 'Map network drive'.
  1. Select a ‘Drive’ letter from the drop down box that is not in use. 
  1. Copy the document library URL.
    Note: copy only to the top-level of the document library, for example - https://collaborate.deakin.edu.au/division/esolutions/TeamInformation/<document library name>/folderA/folderB/folderC
  1. Paste this URL in the ‘Folder’ textbox. 
  1. Click “Finish”.
The entire document library is now available to you when you click on the relevant network drive.

Sunday, March 4, 2018

Infopath alternatives - a quick tour

Given the end of life of InfoPath - supported till the end of 2023, what is the recommended alternative going forward for new development?


The roadmap going forward is via 1) PowerApps and 2) Microsoft Flow. These products are not direct replacements for InfoPath offering a much wider canvas. It's likely, imho, that Microsoft will craft a forms product from the PowerApps and Flow platforms.
I'm guessing more to be said at Ignite. Keep an eye on the Office 365 Roadmap too. 3) Nintex is a strategic Microsoft partner is this area so may still be the right choice and InfoPath still has legacy support for some time but I agree not for new projects.  BUT Nintex pricing is insane.


You could also take a look at 4) Lightning Tools or 5) Skybow products, or 6) StratusForms (The commercial version of Forms 7 which was a community solution, but is free for non commercial use.)

https://lightningtools.com/products/lightning-forms/
https://www.skybow.com/
http://www.stratusforms.com/

7) SPARK is web-based forms builders that lets you quickly and easily create multi-lingual electronic forms within SharePoint environment and Office 365.

SPARK which refers to "SharePoint Advance Redesign Kit" allows users, designer and SharePoint admins to easily build highly professional forms in SharePoint platform simply by placing a rich set of drag/drop controls in a user-friendly editor which let them also controlling and configuring the control’s properties, style, validations, rules and formats and publishing these forms to SharePoint lists and libraries by just a click.

​Using SPARK, you can easily and quickly create and design controls in your form by dragging and dropping them in the design canvas. You can create simple forms and apply simple business rules without effort, also you create complex and logic-driven forms using OOTB SPARK functions, JavaScript, jQuery and Cascading Style Sheets (CSS). Using SPARK you decide the information your business needs and use a SPARK's controls, tools, bult-in functions, rules and features to design and update forms to your exact specifications.

http://www.itlaq.com

https://youtu.be/UGnOHrNsZqI 


8) http://www.flowforma.com/
 

Saturday, February 3, 2018

Exclude Disabled users from People picker

https://sharepoint.stackexchange.com/questions/125977/why-do-i-still-see-a-useraccount-in-the-people-picker-but-this-user-account-is

**
http://www.sharepointdiary.com/2011/09/sharepoint-people-picker-shows-deleted-users.html

***
http://www.sharepointdiary.com/2012/04/delete-users-clean-up-user-information-list.html

You can delete users individually from  the hidden list
http://rfportal/_catalogs/users/simple.aspx


Bulk remove, my solution
https://www.sharepointrelated.com/2012/10/11/remove-users-from-user-information-list/

https://www.qdoscc.com/blog/sharepoint-tips-remove-disabled-user-profiles-search#comment-142
 

Monday, July 3, 2017

How to add a Link to a Document external to SharePoint


How to add a Link to a Document external to SharePoint

You can add links to external file shares or/and file server documents to your document library very easily. Why would you want to do this? Primarily so all your MetaData to all your documents are searchable in the same place.

First a Farm Administrator will need to modify a core file on the front end server.  Then you must create a custom Content Type. If you use the built in content type you will not be able to link to a Folder directly.
Edit the NewLink.aspx page to allow the Document Library to accept a File:// entry.

  1. Go to the Front End Web Server \12\template\layouts directory.
  2. Open the file NewLink.aspx using NotePad. If I have to tell you to take a backup of this file first then you have no business editing this file (really).
  3. Go to the end of the script section near top of page and add:
    function HasValidUrlPrefix_UNC(url)
    {
    var urlLower=url.toLowerCase();
    if (-1==urlLower.search(”^http://”) &&
    -1==urlLower.search(”^https://”) && -1==urlLower.search(”^file://”))
    return false;
    return true;
    }
  4. Use Edit Find to search for HasValidURLPrefix and replace it with HasValidURLPrefix_UNC (you should find it two times).
  5. File – Save.
  6. Open command prompt and enter IISreset /noforce.
Important: To link to Folders correctly you must create your own content type exactly as below and not use the built in URL or Link to Document at all.

Create custom Content Type
  1. Go to your Site Collection logged in as a Site Collection Administrator.
  2. Site actions – Site Settings – Modify All Site Settings.
  3. Content Types
  4. Create
  5. Name = URL or UNC
  6. Description = Use this content type to add a Link column that allows you to put a hyperlink or UNC path to external files, pages or folders. Format is File://\\ServerName\Folder , or http://
  7. Parent Content Type,
    1. Select parent content type from = Document Content Types
    2. Parent Content Type = Link to a Document
  8. Put this site content type into = Existing Group:  Company Custom
  9.  OK
  10. At the Site Content Type: URL or UNC page click on the URL hyperlink column and change it to Optional so that multiple documents being uploaded will not remain checked out.
  11. OK
Add Custom Content Type to Document Library
  1. Go to a Document Library
  2. Settings – Library Settings
  3. Advanced Settings
  4. Allow Management Content Types = Yes
  5. OK
  6. Content Types – Add from existing site content types
  7. Select site content types from: Company Custom
  8. URL or UNC – Add – OK
  9. Click on URL or UNC hyperlink
  10. Click on Add from existing site
  11. Add all your Available Columns – OK
  12. Column Order – change the order to be consistant with the Document content type orders.
  13. Click on your Document Library breadcrumb to test.
  14. View – Modify your view to add the new URL or UNC column to your view next to your Name column.
Create Link to Document
  1. Go to the Document Library
  2. New – URL or UNC
  3. Document Name: This must equal the exact file or folder name less the extension.
    1. Example: Reviews
    2. Example: Folders3
    3. Example: Doc0
  4. Document URL: This must be the UNC path to the folder or file.
    1. Example: http://JKsharepoint.BlogSpot.com/Folder1/Folder2/Reviews.doc
    2. Example: http://JKsharepoint.BlogSpot.com/Folder1/Folder3
    3. Example: File://\\ServerName\FolderName\FolderName2\Doc0.doc
You might see other blogs that say you can't connect to a folder and must create a shortcut first. They are wrong. You can by the method above.

Some common mistakes are:

  1. People use the built in Link to Document content type thinking it is the same or will save them a step. It is not the same.
  2. People click on the NAME field instead of the URL field. They are not the same. You MUST click on the URL field to access the Folder properly.
  3. People type the document extension in the Name field. You can not type the extension in the name field. It will see it is a UNC path and ignore the .aspx extension.
  4. People enter their slashes the wrong direction for UNC paths.
  
HOW TO SHARE FILES AND FOLDERS EXTERNALLY IN SHAREPOINT
https://sharepointmaven.us10.list-manage.com/track/click?u=2151858059c31b8d569544bb7&id=09c3070c9f&e=df6d7ec3a2

Monday, June 19, 2017

Sharepoint workspace 2010:account recovery cannot be processed at this time

If you receive this error : 


"Your request for account recovery cannot be processed at this time"

And you don't need your workspace anymore, simply do the following

1) Run CMD command & go to this location (where the groove exist - groove is the father of workspace)

C:\Program Files\Microsoft Office\Office14

 2) Run this command:

Groove /clean /all

 & the message will disappear .

Friday, April 22, 2016

sharepoint workspace 2010 - Error: Running in limited functionality

Sharepoint  workspace 2010: gives the error below once you login, & then usually no files can be open without a very long delay

Error : sharepoint will run in limited functionality 

Solution: follow these steps: 

1) Add the following files to your local windows firewall (even if you are on a domain)
Groove.exe 
MSOUC.exe
MSOSYNC.exe
these files are located:
C:\Program Files (x86)\Microsoft Office\Office14

p.s. :make sure that these files are allowed on all your netwoek types (public, private &home)
2) download then install these hotfixes on your windows
 

Windows 32 bits hotfix from HERE
Windows 64 bits hotfix from HERE


Wednesday, March 2, 2016

SharePoint 2010 - Export Selected Items to Excel


In SharePoint 2010, sites can export custom list items to Excel using the Export to Excel option in the ribbon toolbar. It will export all items in that particular view in which the option is invoked. SharePoint literally is not exporting the items it creates in the query file instead, which will have the view id and helps to query the SharePoint list data and the results are shown in the excel spreadsheet. 

Now if I have a requirement something like, I need to export only specific items from the list. Let's say I want to export only 10 items out of 30 items shown in the view then there is no direct option for that. I need to create a view and apply filter to extract only the specific 10 items which I want to export. But I can' t create views every time to export any specific items. What if I don't have appropriate permissions to create views? 

To overcome these kind of issues, I have found a component which will export the specific items from the custom list. Its a custom action which will create the "Export to excel" ribbon button. Just select the items and click on the button in the ribbon to export the items.

Here's the simple, fast solution WSP for how to Export custom list items to Excel in SharePoint 2010. 

Download it from HERE

How To

  1. Deploy the WSP to the concerned web application
  2. Go to site features and activate the feature
  3. Use the export functionality in the custom list
Thanks to Code Project

 *******

Another issue, If you want to export to excel based on a certain filter, just make a view with this filter.

Tuesday, February 23, 2016

Sharepoint 2010 Lists not showing title all suddenly on adding or editing .


You have Sharepoint 2010. Everything was fine, until suddenly Lists are not showing title on editing or adding.. Even If you try creating new lists, same problem. Solution?

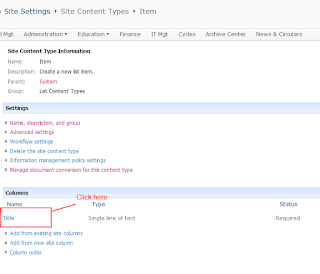
Go to main Site then:

Go to Site Actions Then Go to  Site Settings Then Go -->:(Galleries) Site Content Types : 

from  List Content Type, click on: Item  

-->:Click on the "Title" under columns

 And then make sure you choose required. 


Wednesday, January 6, 2016

Sharepoint Library : Download Error (Size)

PROBLEM:

From a SharePoint 2010 Library, you try to download some shared files and came across an issue where all files larger than 50MB generated the error above, specifically Error 0x800700DF: The file size exceeds the limit allowed and cannot be saved. 
The problem is with the Windows 7 machine you are using but this solution also applies to Windows 8.

SOLUTION:

The solution is editing the registry by following the instructions below:

  1. Go into Regedit

  2. Navigate to: HKEY_LOCAL_MACHINE\SYSTEM\CurrentControlSet\Services\WebClient\Parameters\FileSizeLimitinBytes

  3. The default value in the FileSizeLimitinBytes DWORD is shown by the following screenshot and is set to 50MB (50000000). The value in the DWORD is in bytes.

  4. Please click on the picture to get a clearer view

  5. Change this value to a value of your choice and hit ok

  6. Don’t forget to restart your computer.

Tuesday, June 9, 2015

“Approaching SharePoint Web site storage limit”

The problem:

If you’re running SharePoint 2010 Enterprise, chances are eventually you’ll see this e-mail:
Subject: Approaching SharePoint Web site storage limit
Body: You are receiving this e-mail message because you are an administrator of the following SharePoint Web site, which has exceeded the warning level for storage:http://[sharepoint]/sites/[site collection]/. To see how much storage is being taken up by this site, go to the View site collection usage summary: http://[sharepoint]/sites/[site collection]/_layouts/Usage.aspx

What is it?

Don’t panic. It’s just the SharePoint Site Collection Quota doing its job.
A quota template consists of storage limit values that specify the maximum amount of data that can be stored in a site collection. When the storage limit is reached, a quota template can also trigger an e-mail alert to the site collection administrator. You can create a quota template that can be applied to any site collection in the farm.

How do I change it?

Follow these steps:

1- Go to Central Administration. (Application Management --> Site collection --> Specify Quota Templates --> edit existing template --> Change storage Limit to your wish (ex: 100mb to 300 mb) --> warning email Limit to your wish (ex: 80 mb to 280 mb) --> save.)


2- Specify Quota Templates
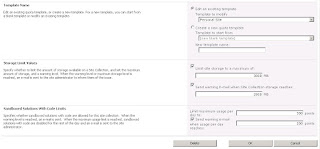
Specify Quota Templates allows administrators to define templates to later be applied to multiple sites.

Template Name : Allows the administrator to choose a template to edit or create a new template from scratch or existing template.
Storage Limit Values: Allows the administrator to set a site storage limit and a warning e-mail limit.
When a site storage limit is reached, the site is locked from any content being added. To enable just check the box next to “Limit site storage to a maximum of:” and specify a size limit.
When a site warning e-mail limit is reached, Site Collection administrators receive the e-mail noted at the beginning of this post. To enable just check the box next to “Send warning E-mail when Site Collection storage reaches:” and specify a size limit.
Sandboxed Solutions With Code Limits: Allows the administrator to set a limit on the maximum usage of Sandbox solutions per day, and have a warning e-mail generated when a sandboxed solution reaches a points-based threshold.
When a sandbox solution reaches the maximum point allotment, the code is disabled for the rest of the day and site collection administrators are alerted via e-mail. To enable just check the box next to “Limit maximum usage per day to:” and specify a point limit.
When a sandbox solution reaches the warning threshold, the site collection administrators are alerted via e-mail.  To enable just check the box next to “Send warning E-mail when usage per day reaches:” and specify a point limit.

3- Specify Quotas and Locks

Specify Quotas and Locks is where administrators go to specify quotas to use on a given site collection. Quotas can either an individually specified quota or a Template .

Site Collection: Allows the administrator to choose which Site Collection to apply settings to.
Site Collection Lock Information: Allows the administrator to manually set lock status on a site collection.
Site Quota Information: Allows the administrator to choose a Quota Template (see above) or specify individual quota settings for a site collection. Individual settings are the same as “Site Template Settings” (see above).

Considerations:

So what do we set these at anyway? Well there are a few very important considerations to be made.
  • How fast do I expect this site collection to grow?
    • The whole purpose of this alert is to give you a clue how rampant growth is in your environment. You don’t want to get e-mails every day, so consider setting this high enough that it doesn’t bother you, but low enough so that you have time to react.
  • Is my site collection database shared?
    • If so, how much of the full database do I want to limit this particular site collection to?
  • Is my site collection database at risk of running out of space?
    • If so, set these quota low and consider breaking your site collection up.
      • Remember : The recommended maximum database size is 100GB. The maximum supported database size is 200GB.

I hope this helps! If you just want the e-mail to go away, feel free to climb in and shut the darn thing off. I wouldn’t though, quotas are a great tool for your governance tool box! Use them wisely my friends!

Now, Changes to pre-existing My Sites should be effected by manually applying a Quota Template to that pre-existing My Site – if you wish to change the quotas for a given My Site you do so by applying a quota template to the My Site. If you wish to make changes to an existing quota template and have those changes reflected in existing My Sites you must re-apply that quota template to all My Sites which were created with it.